Baby tales: what I’ve learned In 3 months.

So many aspects of my life have changed now that I am a mom, which is completely expected. But there’s so many changes that have completely caught me off guard. If you are a mom, I’m sure you can relate to a lot of this. If you are a soon-to-be mom, get ready. If you’re planning to be a mom in the near feature – get ready for the ride of your life!

1. My baby story wasn’t my ideal story given that I had to have a Cesarian, but if I knew then what I know now, I would have accepted it with open arms when my doctor initially suggested it (Liam was a fairly large baby).

Baby Battin The worst of the C Section was not being able to help change Liam or pick him up while he was crying during that first night. Everything after that was smooth sailing. I was right back to running in 5 weeks (shhh don’t tell my doctor)!

2. I never ever, ever, ever times infinite thought it was possible to have so much love for someone, let alone someone who spends most of their day sleeping, messing a diaper and crying. The love you have for your child is overwhelming at times. You hear mothers say it all the time, but I don’t think you really ‘get it’ until you have one of your own.

3. During my pregnancy days, I never really had any food cravings, which was really disappointing. I kept waiting for that 2 a.m. craving to send my sleepy hubby to the grocery store, but it never came. What I wasn’t expecting was for my taste buds to change post-pregnancy. I used to strongly detest bananas and now I eat one almost every day. I was also never really a pop drinker and now I find myself salivating over the sound of a pop tab opening. And the worst……all I want is candy, chocolate, cake……you name it! If it’s sweet, I want it. It’s really putting a wrench into my whole, “Lose the baby weight” program I’m on.

4. Going back to work was truly exciting for me. I was more than ready to get on a normal routine and I actually love the title of, “Working Mom.” It’s kind of synonymous with Wonder Woman. Giving Liam to a room full of strangers was another story. I made my husband drop him off at daycare because I new I would be a bumbling fool. Luckily, he goes to Le Chaperone Rouge which has been a godsend! All of the girls are so sweet and polite. It makes me feel good knowing he is in such good hands.

5. Huggies are not my friend. I’m not a fan of their overly elastic bands and have had many accidents that were not contained (if you know what I mean). I am, however, a huge proponent of Luvs and Pampers. They both fit perfectly and have really minimized Liam’s need for multiple wardrobe changes.

Huggies no good

6. SLEEP! I actually get more sleep now than I did when I was pregnant (knock on wood). Liam is an excellent sleeper. He has always been a good sleeper, he just had issues with going to bed before 3 a.m.  I would say at about week 10 he finally got on track and started to go to sleep at 10 p.m. and sleeps through the night.

7. Since I’ve become my mom – I am a worry wart. All I do is worry! Is he eating enough? Is he sleeping too much? Is he catching a cold because he is sneezing? It’s a full time job just worrying, and it’s just the beginning.

8. I was pretty adamant about wanting to establish a good sleep/feed routine for Liam, probably sooner than he was ready for one. I learned quickly to forget trying to establish a routine. Liam got on one when he was good and ready. My advice; spare yourself hours of reading books and online articles. Just go with the flow!

Baby and me

Did something happen to you post-baby, or did you learn something new that you were not expecting? I’d love to hear about it! Just comment in the box below.

How we cut the cable cord.

For the last year or so, my husband and I have gone back and forth discussing whether or not we should cut our cable expense. A hundred extra dollars a month in our pockets sounded really good, especially now that we have another member of the family. The downside would be the lack of sports my husband would be able to watch. But last month we finally decided to do it. It was a lot like pulling off a band-aid. The initial sting was a bit painful, but eventually, you forget all about it.

Here’s how we did it:

  1. Research, research, research. We looked into all of our options for streaming programs which included Roku, Google Chromecast and Apple TV.  Once all the pros and cons were weighed, we decided to go with the Roku. We liked the various options Roku offered, as well as the price and free channels it already came with. The best way to describe Roku is that it looks like a tiny box that hooks up to your tv and internet. When you turn it on, it displays a series of apps such as Netflix, Hulu Plus, Amazon Prime, etc. All you have to do is sign up for accounts with these sites and then you can stream shows right from your tv!
  2. After we bought the Roku, we immediately began our free trial with Netflix. To our surprise, there were more television shows then we were expecting. It’s great for catching up on older series that you may have missed.
  3. Next came Hulu Plus which also offers a free trial, but unlike Netflix, it’s only a week. While Hulu Plus is great for watching more recent television episodes, I must admit, I was a bit disappointed in how they claim to carry certain networks – particularly Bravo and E! The article I read explained how they now carry episodes from these networks which was music to my ears given the fact that these are the two networks that probably take up most of my television-watching time. Unfortunately, once we got Hulu Plus, not only could those networks only be streamed on your computer (not the Roku) they only feature clips of shows from these networks – not full episodes. So I’ve had to say ‘goodbye’ to everyone from all the Real Housewives, as well as Chelsea Handler, Reza Farahan and his Persian posse, Andy Cohen and many, many more.
  4. During these free trials, we still kept cable just to be sure we were comfortable with our new entertainment situation. It wasn’t until my husband went on our cable provider’s website to look at our account when we decided enough was enough. For two + years we had set up automatic pay for our cable. Well, come to find out, they increased both our internet and cable multiple times over those two years and never notified us, so now we were looking at a balance of close to $300. That was the straw that broke the camel’s back.
  5. During our call to cancel our cable, we made sure we upped our internet speed. Since Roku runs off your internet connection, a fast speed is of the utmost importance.
  6. Now that cable was history, we lost all of our local channels and if I didn’t have my mornings with Kristie and Wayne, I would not be happy camper. Luckily, all we needed was a digital antennae. These range anywhere from $20 – $70. We ended up buying two, one for the bedroom and one for the living room. The antennae purchased for the bedroom was of the lower end (similar to your typically rabbit years)  while the other was much more expensive. My husband was sold on the fact that the more expensive one would be able to pick up more channels. Well, it doesn’t and because we have our television mounted, we can’t get away with purchasing the cheaper one for the living room, so the expensive one is here to stay.
  7. The final step was to purchase another Roku for the bedroom, since we already knew we liked the first one we bought. Now we can watch the same channels in the living room and bedroom.

Since cutting cable, I have noticed that I really don’t miss it all that much. For all the shows that I can no longer watch, I have found new ones to replace them. It really has been one of the better decisions we have ever made and I’m really happy with how easy it all was. The initial start-up cost is a bit pricey. I think we spent around $180, but in the end, we are saving about $1,200 a year. The biggest change I have noticed is that watching a full episode of anything is next to impossible with a newborn and when we do get a chance to watch something, I usually fall asleep 10 minutes in, so that could very well play into why I don’t miss cable as much as I thought I would.

This USA Today article/video series on cutting the chord was very helpful in starting to process to getting rid of cable. Got any questions that I may not have covered? Just leave a comment in the box below!

What’s for dinner?

For quite some time now, I have been eying various menu planning techniques that people use in their homes to stay organized. While I found a lot of them in blogs and on Pinterest, not one of them worked completely for our family. Instead of replicating one of the plans I found online, I took bits and pieces of a bunch of them and developed my own. The best part – it cost me a total of $9.00, give or take a few cents for tax.

I started off needing a cookie sheet. Believe it or not, this was more difficult than it seemed. I couldn’t fine one that was large enough, and I didn’t want to spend a fortune on one. After visiting Target and Walmart, I ventured over to Ollie’s. I should have went there first! I found an awesome cookie sheet for $6.99. Rather than making a craft out of this sparkly new cookie sheet, I opted to keep this new one and use one of my old ones for my craft.

Once I got my cookie sheet, I was ready to craft! I searched through my craft cabinet for fabric, ribbon, magnetic tape, construction paper, ribbon and letters. To my surprise, I actually had everything I needed! I gathered it all together while my husband did this…..

dinner planning

I started by applying fabric to the back of the cookie sheet using Elmer’s Adhesive Spray. I absolutely LOVE this stuff!

Elmer's Adhesive Spray

Once that was accomplished I added the title, “BATTIN MENU” and days of the week. Because my husband and I would prefer to plan meals only two weeks in advance, I added two lines of ribbon to break up the weeks.

meal planning

Once this was finished, I started cutting,, cutting cutting squares! Each square includes a dinner that is often eaten in our home. The dinners with an * means there is a recipe to follow (I will get to this more later). On the back of each square, I taped a small strip of magnetic tape.

materials for meal planning
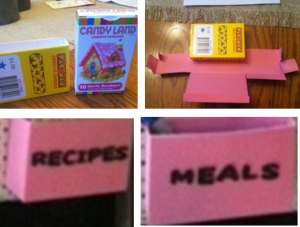
At this time it was back to the store for me! I wanted to have two small boxes on my board – one to hold all the dinner options and one to hold the recipes needed if one of the meals that week requires a recipe (remember the *)! I found the perfect size boxes in the One Spot at Target. They were actually band-aid boxes, but they worked! I brought them home, cut them up and origami-ed construction paper around them, added sticky letters and BAM I had my boxes.

meal planning boxes

The last step was to add a ribbon to the top of the board so that it could hang. Using my handy dandy hot glue gun, I secured this ribbon. Now our menu board hangs beautifully on the side of our fridge!

meal planning board

Here is the entire station – calender and shopping list included. Ahhhh I’ve never felt so organized! Now my husband has no excuse not to start dinner if he gets home before me!

meal planning station

A quack-tastic ducky themed baby shower.

If feels like forever ago, but really it was only last year this time that I was planning a baby shower for my cousin’s first child. I insisted on heading up the decoration committee since I love crafts and planning parties! As soon as I got the green light on the ducky theme, it was full speed ahead!

Up until delivery, my cousin had no idea what she was having, so we opted for a gender neutral theme – and what more neutral than a rubber ducky!
Here is a recap of the beautiful day!
Gift station complete with a ducky gift sign.
 sign and picture
Table filled with gift bags and green and yellow polka dot boxes full of M&M’s for baby bingo.
duckk themed game table

Giveaway bags that contained lotions, fragrances and all things nice for those who won baby bingo.

rubber ducky themed gifts

Here is the “guess how many kisses bottle” next to my all time favorite decoration – rubber duckies in a bowl of cotton balls! I should have gotten a close up, but I didn’t!

rubber ducky themed game

Dessert station.
rubber ducky desserts
For favors, everyone got to take home a bag of homemade ducky cookies complete with a “Thank you” stamped tag. Stamp was purchased at Pat Catan’s.
rubber ducky cookie
For the tables, we kept with the green and yellow polka dot color scheme with these super cute porcelain pots from the One Spot at Target.
rubber ducky decorations
And the silverware was all wrapped in yellow polka dot ribbon that we found at the The Dollar Tree.
party silverware
 Even the water bin got some ducky love!
rubber ducky water bin
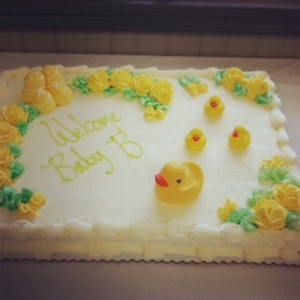
 And finally, the cake!
rubber ducky cake
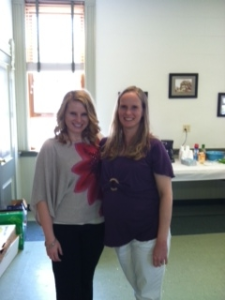
Me and the mommy-to-be (mommy now to a beautiful baby boy!)
rubber ducky themed shower

Countryfy your playlist.

cowgirl
Those who know me know I love country music. And every time I hear an outsider’s perspective of country music, I just chuckle because nine times out of ten, they describe it as, “Hillbilly stomping crap,” “Only for rednecks,” or my personal favorite, “It’s just a bunch of dudes sitting on the front porch whining about how their woman left them and their dog died.” Oh the contrary my friends. Country music doesn’t follow any of the typical stereotypes that people generally categorize it in. In fact, it can be pretty motivational during a workout. So, to help you run that extra mile, or squeeze out that extra set of reps, here are some my favorite, must-have country tunes to add to your workout playlist.
Got any more suggestions? Leave them in the comments section below!

Journey to a 10K.

As a runner, throughout my entire adolescence, my mom tried desperately to get me to join her on the track. I remember like it was yesterday, going to the outdoor track next to our house almost every day, riding my bike or reading a book while my mom went round and round and round the track. After her 12th time around, like any child, I became EXTREMELY bored.

Unfortunately, it wasn’t until I was 18 and moved out of the house that I caught the running bug. For almost 10 years now, I have been consistently running. Now, by running, I mean I run for fun. I have never participated in any races and in general I only run approximately 10 – 15 miles a week, which really isn’t that much.

This year, I have decided to make a list of goals to accomplish in 2013. One of these goals was launching this blog. The other is to participate in a race. Rather than starting off with what normal people would do, a 5K, the nut-job in me decided my first race would be a 10K.

This past week was my first week of training. I thought the easiest way to accomplish my training was to download an app. The Nike+ Running App is great for running, but it doesn’t have a training option. I ended up downloading the Run Training App for free. This app has several training options to choose from. I have used it three times and am pretty happy with it, aside from the fact that the GPS doesn’t seem to be working on it. I’m not sure if it is because I am using it indoors, but to fix that problem, I just run my Nike+ App the same time I run the Running App. This way, I know how far I have gone and my pace.

I am already a runner, so I cheated a bit and jumped to week 5 of the 13 week training program. Each week consists of three days of running. I now have one week under my belt and feel great! I must say, I was pretty surprised how sore I actually was. Typically, I can run a 4 or even 5 miler with no soreness. Now that I am doing interval running with this training program, I am actually a bit sore!

I’ll keep you updated from time to time on my journey to a 10K, so stay tuned! And to give me a little bit more motivation, I just purchased these new beauties.

ascics running shoes

Not your grandma’s hutch.

My grandma pasted away several years ago when I was a teenager and after her passing, my mom inherited her china hutch. So naturally, when my mom decided to update her entire living room, she passed the hutch down to me. Enter new project: furniture update!

Hutch Before Paint

While the hutch was pretty and petite, it was not technically all wood. Parts of it were made of particle board. Right away I was ecstatic that this furniture update would not involve staining as I didn’t think it would be appropriate for the particle board. Instead, I decided that it needed to be transformed from a wood, stained hutch to a painted hutch.

I started off explaining the project to a coworker of mine who, luckily for me, also loves furniture update projects. I brought in one of the wood drawers that he took home to strip and sand for me. My original plan was to strip and sand the rest of the doors and sections made of wood, but then I came across this: Klean-strip Sander Deglosser. This product is perfect for those furniture updates that you don’t want to strip and sand.

Deglosser

The directions were so easy! Pour the deglosser onto a course rag and rub in a circular motion over the desired area. I repeated this method twice over every section of the hutch. From there, since I was planning on painted the hutch, I went back over the entire hutch with a light sand paper, followed by primer.

Finally, the fun part came – painting! I love this part because it is the first time that your updated furniture starts actually turn into something nice. After two full coats, some touch-up coats and new hardware, I had myself a painted hutch.

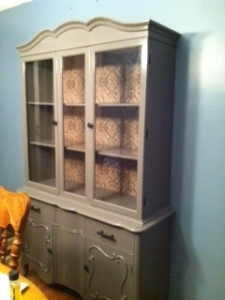
Painted Hutch

The last part was probably the most difficult. I really wanted this painted hutch to be different and unique to my style. Thanks to Pinterest, I came up with the idea to wrap fabric around the backing behind the glass. It was the perfect way to transform my updated furniture from old to modern! The hardest part was picking out a design that matched the living room and the dining room since these two rooms in our house are connected to each other. Surprisingly, I found the perfect design from Walmart!

Walmart Fabric

I wrapped the fabric around the back piece using Elmer’s Spray Adhesive from Pat Catan’s, asked my husband to nail it in place and voila! My new piece of updated furniture: a freshly painted hutch.

hutch before and after paint

hutch after paint

I image grandma is either really proud of me, or rolling over in her grave. I like to think it’s not the latter.

Do you have a question about my furniture update? Leave it below in the comments section!

Spring has sprung.

Looks like spring is deciding to make an early March appearance in Cleveland, Ohio! A colorful wreath is just what our front door needs to welcome the new season! With a combination of felt, beads, needle, thread, hot glue gun, Styrofoam wreath and yarn, I created this joyful spring wreath. The best part about it was it cost less than $10.00.

spring flowerr wreath

spring wreath

What you see is what you get.

For a few months now, I have been collecting photos of my crafting projects and filling up Word documents with how they were done. I’ve gone back and forth wanting to start a blog of my own, but it wasn’t until my fellow co-worker, Rachel, started her blog, The Reveler, that I decided it was time.

Generally speaking, just about every week day around 5:00 pm, my husband receives the following text or call, “Are you going to be home on time after work to let the dog out?” This usually means one of two things – I am heading to the gym (I love to run) after work, or I need to run into Pat Catan’s. And by ‘run into Pat Catan’s,’ I mean, spend at least 45 minutes there, along with $50 more than I had originally planned.

I currently work full-time in the advertising industry. When I’m not at work managing clients, I like to craft. To me, the idea of crafting is synonymous with taking on a challenge. Can you turn this ugly piece of furniture into a work of art? Can you string these beads into a pair of earrings for next week’s part? Challenge accepted! And when I am not crafting, I organize. My motto is, “An organized life is a happy life.” I love giving everything a home, even if it means spending $75 on baskets to hold a pile of light bulbs and wash cloths.

Truth be told, I wouldn’t have so much passion if it wasn’t for my encouraging, loving husband of 2+ years. He always thinks the highest of me and loves everything I create. And if by chance he does not love it – he tells me that, too.

While I am starting this blog to share my crafting, organizing and home improvement projects with the World Wide Web, I started finding my zazu for no one other than myself. I wanted a place to keep all of my ideas, visions and creations. All of you reading them is just an added bonus.

So what does finding my zazu mean? Not to be cufused with the bird character from the Lion King, zazu (pronounced za-zoo) is defined as something special, a passion, a feeling like love. Zazu is precisely what is inside me when it comes to organizing, crafting, home improvements, designing, cooking, running, music and now, anything babies thanks to my new baby boy, Liam. The blog name pretty much speaks for itself. By reading this blog you will be witness to me finding my zaza through everything I create.